What tech do you take with your trekking? The best advice I received was to listen to what 10 people have to say and ignore 9/10ths of it. So here’s some more stuff you can ignore. As it turns out, the most expensive and newest was not necessarily the best.
After many years I’ve finally got a pass from the wife to do some trekking in Nepal (Everest Base Camp + the Gokyo Lakes). I’m away for a few weeks and I’ve pondered what to take and what to leave.
I’m getting a bit older these days and I’ve got a porter to help me out, but I still need to lug a bunch of stuff around. At over 5000m, 10kg feels like 30kg so it becomes an important juggling act to what to take. I like my photography, I like my tech. I want it all.
I’ve spent hours troweling the blogs and with a few months of deliberation I’ve listed what I’ve chosen (and actually listened to some advice myself). If it helps out anyone with their choices, then great 🙂
One key tidbit – I do expect to have charging issues. Batteries don’t work well in the cold and I’ve been told to sleep with my batteries to keep them warm. Awesome.
Smart Phone
An obvious one. When I went trekking 7 years ago in Nepal I had the original Android HTC Dream. Although cool at the time I had two major problems with it: no charging and no reception. It kinda bugged me that even the porters were using their phones without issues at the time. So these will be rectified hopefully!
The first is reception. I’ve worked out that Ncell has the best reception around EBC. I should expect 2G to 3G data rates in most locations with Edge or nothing elsewhere, and WiFi in many of the tea houses for a price.
I’ll get a prepaid service when I’m in Thamel, Kathmandu. I’ll need to show my passport, give them a passport photo and apparently you can be up and going within a few minutes. This is cool.
I have a (now) old Sumsung S5 in which I’ve replaced the battery. It’s looking a little beat-up these days and probably will be a lot more when I’m done with it.
I’m using a Geo-Location app called “Real-Time GPS Tracker” and anyone can access your location via a URL (not pointing to me just yet). A great way for your friends and family to track your travels. I’ll be turning it off when I’ve finished the trek. It will need GPS and reception, so it will use a bit of power. I’ll be turning down the rate of updating down low enough so as not to discharge the phone battery too quickly.
I’ve also removed any apps that consume excess battery power, and I’ll probably shut down Bluetooth unless I need it.
Weight: 145g
Also Taking: charge cables, protective cover.
In the day pack: Yes.
After Trek Verdict: A no brainer even just to kill time. Most of the locals carry two phones – a cheap Nokia which lasts for weeks on one charge and a smart phone.
I ended up getting my SIM card in Lukla – no passport photo was required at all. I had connectivity when a lot of trekkers didn’t.
The phone doesn’t work well above Namche Bazaar for connectivity. If it did work, it only worked at some points. I had to use teahouse wifi in many places – the reception is just that poor (Gorak Shep worked for a while at low speeds).
Just note: I burnt through 800MB within 3 or 4 days. I had to get a recharge at Namche Bazaar – it doesn’t last long!
The GPS tracker worked really well even without connectivity everywhere. It would just work it out when I did.
Online Blog
I had visions of updating my wife and family with daily updates of where I was with pictures and stories of the current events. I must admit it was an idea that was embedded with fantasy. A couple of camping trips away to try this out brought me back to reality:
- Internet speed. Uploading a number of pictures and mucking around with an unresponsive blogging web page on a slow internet connection is a good way to ruin a nice evening. If I want my wife and family know what is going on, then I’ll pick up the phone and call them. Yes, there is a 4 hour time difference so I’ve just got to work with that.
- Its a good way to burn battery power for a number of devices.
- The internet around EBC is sufficient to send a Facebook post and to send simple emails, so this is my expectation.
- Like I’m really going to feel like fine tuning a blog entry after several hours of hiking at 5000m. Just take some notes and chill sounds much better. And then sort that out when I’m back at home at sea level over a nice red 🙂
So this had a big impact of what I was taking and what I was leaving behind.
After Trek Verdict: A good call. Don’t even bother.
Olympus OM-D EM1 Camera
This is one great camera. Small, compact and ridiculously powerful. It uses an 18mm sensor size (micro 4/3) rather than a full frame of 36mm. This results in much smaller (and cheaper) lenses – important if you are on a weight budget. It gives you the pro features for a great price and is a very underrated camera. Your basic Canon is over 1000g with battery and no lens.

Weight: 560g with battery and no lens.
Also taking:
- 6 extra batteries, weight 270g.
- USB battery charger. Charges via a USB rather than having to use the main power.
Not Taking: a camera bag, flash, cables, mains battery charger.
In the day pack: Yes. Hopefully attached to the day pack strap for easy access.
After Trek Verdict: A good call – it worked fine 🙂
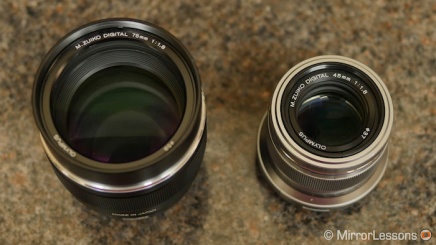
Camera Lens
I thought about this one for ages – to take the 12-40mm zoom or not? Or all my primes (I have the 12mm (f2.0), the 25mm (f1.8), the 45mm (f1.8) and the 75mm (f1.8). Multiply by 2 to get the equivalent full frame size (so the 25mm = 50mm)
These primes have great glass (see the DXOMark results) and it was hard to leave any of them behind. So I’ve decided in taking all 4 primes that I have. Less then 1kg for all of them and one of them is a telephoto (equivalent to 150mm).
Also taking:
- Three polarizing filter lens (37mm, 46mm, 58mm).
- Four hoods.
- Lens cleaning kit
Not Taking: The 12-40mm zoom (380g)
Weight: 130g, 137g, 116g, 305g (in ascending focal length, without hoods) and probably just over 1kg including hoods, filters and cleaning kit.The 75mm lens is definitely the heaviest of the primes at double the weight of any of the others.
In the day pack: Yes for most sections. I’m guessing I might not take all the lenses up some of the mountain visits.
After Trek Verdict: I had the lenses all in my bum bag. Changing lenses was straight forward.
Except when it dropped to -8 degrees in which case changing lenses became quite painful (fortunately only happened once).
Tripod
Do you take a tripod? This was always going to be a yes. There are going to be lots of shots taken in the late afternoon and this is the best time of day when taking photos of things in the East (such as Mt Everest). Unfortunately it needs to be lugged up to any of the mountain viewing spots.
The hard questions was which one? I recently bought a very nice MeFoto Backpacker tripod to replace my old crappy one.
But it turns out my old $50 Slik 500g Deluxe tripod that I’ve had for 20 years is ridiculously light at 500g, and since I’ll be taking it up various mountains that weight becomes critical. The tripod mount has lost the pad, but the Swiss Arca plate compensates for that. It’s also a little faster to set up.
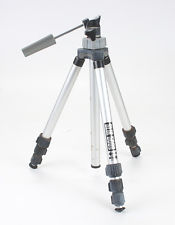
Not Taking: The MeFoto Backpacker tripod which weighs over 1000g.
Weight: 500g, plus 100g for the Swiss Arca plate.
Cost: This tripod is less than $60 AUD. Bargain!
In the day pack: Only on selected hikes where I know I’ll be using it.
After Trek Verdict: A good call. It was very light and easy to take up on day trips up mountains. In saying that one of the feet fell off and I’ve had to buy another one.
Ricoh-Theta S 360° Camera
This one was a recent left-field purchase. I was thinking about a GoPro or similar, but this camera takes 360° photos with no stitching. And 360° movies as well! You can upload these 360° photos to Google Maps, Facebook, YouTube and to the Theta websites. It will add a lot more dimension to the pickies for sure. Here is one that I’ve already uploaded. And it is small and light.

It also means I’ll be taking my Jacko Royal walking pole. It has a camera mount at the top and a built in compass! This walking pole will act as a monopod – otherwise my hand will be a significant part of the shots.
Weight: 125g.
Cost: About $400AUD.
In the day pack: Absolutely.
After Trek Verdict: This and my phone had to be on my bum bag and my walking pole had to be accessible. Once I had that sorted out it was straight forward to use (I used the walking pole as a monopod).
Portable Power Bank
Not all the teahouses will have charging available, so you’ve got to be able to go for a few days without charging.
I got the largest one I could get without hopefully upsetting airport security which are clamping down on chargers. I’ve had one taken from me when I left Beijing Airport earlier this year and it was an expensive battery. The limit is 100WHr and the one I’ve got works out to be 75WHr (20100 * 3.7). There are bigger 26800mAHr models that sit just under the 100WHr threshold, but I didn’t want to risk it. You also have to take it on the plane as carry-on – don’t put it in your luggage.
It’s the Anker PowerCore 20100 with 2 standard USB outputs and a micro USB input. Unfortunately it can only be charged at standard 2.1A rates so it can take some time to charge (the USB-C models can be charged much quicker but I don’t use USB-C yet). It’s relatively heavy and something I won’t be taking in my day pack.
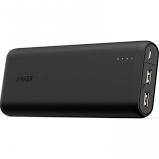
I think the plan will be to charge this up when I get to the tea house and maybe hang two devices off it while charging (it can be charged while charging).
Weight: 250g
Also taking: A mains plug with a USB socket.
In the day pack: No. Unless I feel the need for some solar charging but that’s unlikely.
Cost: About $100AUD.
After Trek Verdict: Great. My smart watch needed the extra charging power – the solar panel wasn’t enough, so this was needed. And anytime I used my smart phone too much it came in very handy.
It was possibly oversized for this trip – I had good weather most of the time. But I imagine if the weather was bad for a week, this sized power bank would have been very useful.
Solar Panel Charger
Some info I’ve got from the blogs is the use of a solar panel charger. Charging your tech isn’t possible everywhere at all times (there is a lot of solar power used by the teahouses, so daytime charging only). And it can be expensive at 1USD per hour. I’ve got a Suaoki 20W Solar Panel.
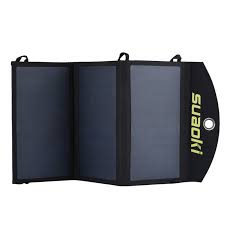
This is mounted on the back of my day pack using some caribenas. It has two USB outputs which are apparently rated at a total of 3.5A. Will you ever see this? No.
I’ve done testing in the middle of a fine day and seen around 1.6A out of it. I’ll also be travelling in November with short days in glacial valleys with sporadic weather. So I have rather low expectations here. It’s also a bit on the heavy side, so we’ll see how this goes.
Weight: 480g
In the day pack: Yes. Unless its a crappy day, then I’ll probably ditch it.
Cost: About $65AUD.
After Trek Verdict: Essential – I didn’t pay for charging once. In fact I was charging my guide’s and porter’s phones in many locations. On a good day I was charging everything my 3pm.
One annoying issue – my phone would activate every time charging began and beep (i.e. turning around into the sun and then away from it). I eventually turned my phone off as this was quite annoying and was using power for no reason.
Bluetooth Keyboard
I got this tidbit from my research, and was part of my vision of daily blogging. Even though this is no longer the case, having a keyboard with a mouse is really useful. I hate using phone screens for typing.
So I picked up a small Bluetooth keyboard with a mouse pad and seems to work brilliantly. Sure beats the hell out of typing with your phone.

Weight: 270g without battery.
In the day pack: No.
Cost: < $50AUD
After Trek Verdict: Turned out to be a bit of a hit with the locals – they’d never seen one before. Even local kids would come up and take a look.
Really useful for writing emails without having to use a smart phone screen and I used it every day. I’d take it again.
Fitbit
I picked up the Fitbit Surge as part of my training. This is after not wearing a watch for 20 years so this was a big call for me.
The data you get from these things is incredible. I don’t really care about how many steps for flights of stairs I’ve done and I probably won’t care when I’m hiking. I did think it could track my daily hikes (do I really want to know that I’ve done 300 flights of stairs today?). The Surge has a built in GPS but it doesn’t really like being turned on for 6 hour hikes. So I might just use this thing as a watch and alarm (the vibrate thing is pretty cool if you don’t want to wake everyone up).
Hopefully this is something I don’t have to charge too often. I might turn it on for a few hikes just to check it out.

Here’s an example of a hike I did for my training:
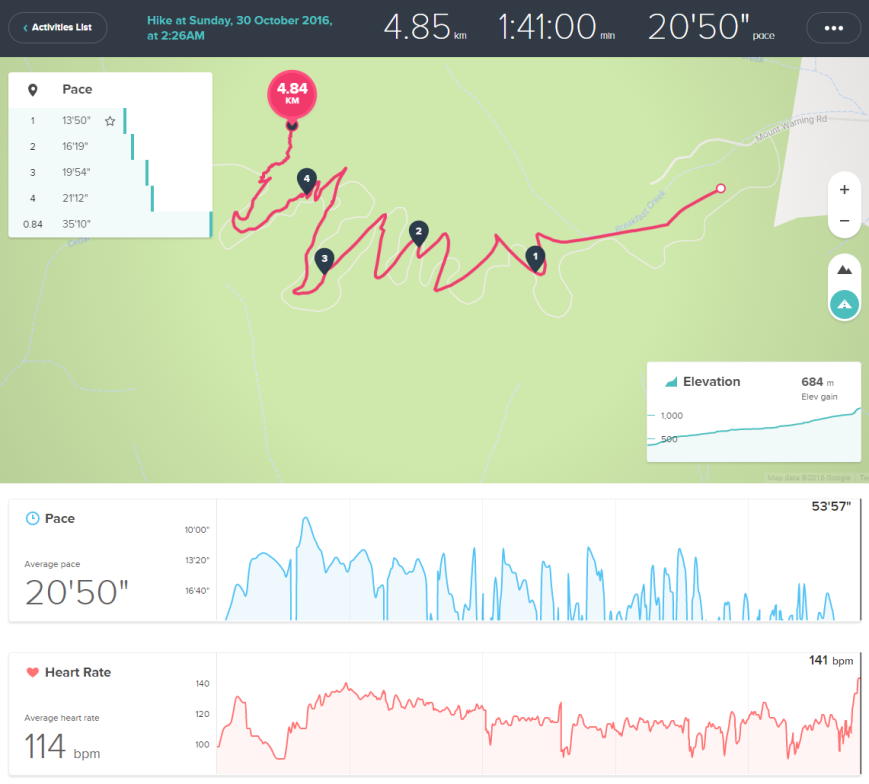
My sleeping heart rate at 4000 to 5000m has got me curious…
Weight: trivial
After Trek Verdict: Not really useful as such. Except to show that I walked up thousands of “floors”.
And yes, my heart rate jumped from 50 something to 70 something at altitude.
Digital Thermometer
Just a small thermometer just to find out why I feel so goddamn cold. And the thermocouple is external so I can possibly throw it out the window and take a look without having to go outside…
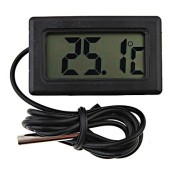
In the day pack: No. Unless I want to know how frozen I am during the day…
After Trek Verdict: Not really useful except to show that it hit -9 degrees C during the night (although it was possibly colder is some places where I didn’t care to look).
Digital Scales
No, not to check whether I’ve lot some puppy fat going up some mountain. A small handheld thing to check what my day pack weighs.
Not 100% sure about the wisdom here, but they are so small and you can see it here:

In the day pack: No.
Weight: trivial
After Trek Verdict: Not really useful. We used it at the start of the trip to measure the weight of the pack (which had the porter’s stuff and a bag of fruit) at 16.5kgs. But I just didn’t use it after that.
USB Drives (and other stuff)
Odds and sods to do backups etc. I haven’t quite gone as far to bring my 2TB USB drive. Just enough to back up some photos etc.
- uUSB to USB/SD Connector
- 32GB USB drive, 2 8GB USB drives
- 32GB SD Card
- SD to uSD Connector

In the day pack: No.
Weight: trivial
After Trek Verdict: Yes – I did my camera backups using these.
Camera Clip
Taking a DSLR camera can be a pain if you’ve got to go into your bag and retrieve it all the time. Or to have it hanging around your neck. So I picked up one of these Peak Design Capture Clips that you just attach to your pack and the camera just sits there attached to the front of your pack for easy access. The clip relies on a Swiss Arca plate, so the camera has this attached to it.


When you want to take a photo, just hit the red button and the camera releases. And then just put it back when you are done.
This could be interesting as it is a bit of a pain when taking off the pack as you’ve got to 1) undo the chest and waist straps of the day pack 2) Unclip the camera 3) Take of the pack while the camera is around your neck 4) Put the camera down.
I can use my bum bag (see below) so we’ll see how this goes.
In the day pack: Yes.
Weight: 110g
After Trek Verdict: Invaluable. It was so easy to take a shot and move on. Those guides/porters want to keep moving.
I should have just bought the non-pro version as I don’t use Manfrotto mounts.
Day Pack
I wanted a day pack to protect the tech, so I chose the large Crumpler Karachi Outpost. This really does have a lot of space (31L), multiple compartments, and spot for a tablet or small laptop. The great thing about it is that you can place it on a muddy surface and access everything from the back. It is probably the best outdoor pack you can get for holding your tech. Having played with it a bit, I think it really is a bit too large. When I put it on it almost looks like a regular backpack. The problem is that it weighs over 2kgs without anything in it. However if you have a lot of gear including a laptop, then this is the ideal choice (which maybe isn’t for me at this time).

You can adjust all the compartments but I’ve just put in some small ones as I don’t have large telephotos etc. In hindsight I probably should have gone for the small Crumpler Karachi Outpost which has a bit less space (25L) but is half a kilo lighter.
My regular crappy day pack is only 700g and is just soooo much lighter. So I’ve abandoned the very nice Crumpler in favour of the light crappy day pack (only $50). Here’s shot of it and you can get it here:

Apparently it fits more than the Crumpler! I’ll take the Crumpler’s weather protection bag and use it for bad weather. There is no chest strap – that might be an issue. I’ve bought a bum bag (see below) to compensate.
Weight: 700g
Not Taking: My heavy Crumpler day pack.
After Trek Verdict: A good call, although the weight of the camera on the shoulder strap meant that a chest strap would have been useful.
Bum Bag
A late purchase based on the day pack I’m using and getting easy access to camera/lenses. After a friend’s suggestion on something similar, I chose the Caribee Road Runner Bumbag:

It is available here. Here’s a shot of it with the zippers opened up:

It has so many things I can get quick access to, including my 360° camera. I’ll look like such a tourist, but whatever…
After Trek Verdict: Invaluable to have had my phone, 360 degree camera and lenses all there to use. Plus a bit of cash in the front zipper so I didn’t have to carry my wallet.
Sometimes the guide/porter had my day pack so I’d shove my camera into the bum bag.
I had to get the side pockets sewn in as they are just held together by velcro which was quite useless.
Travel Clothes Line
Not really tech, but just cool. I got this advice from years of travel. They are just cool. And simple – no pegs required. You can see it here.

Weight: trivial
After Trek Verdict: When you don’t have clean clothes for two weeks, this is real useful (you will probably have to use for two days in a row as there is no way stuff dries when it is so cold).
Stuff I’m Not Taking
There was a bunch of stuff I have and considered taking with me. But sometimes you’ve got to leave some of this crap at home (which could be said for anything on the list above!).
Tablets and Laptops
I seriously considered the Samsung Galaxy tablet I have for blogging on the trek. But it’s more stuff to carry and just couldn’t really justify it. And the laptop I have is just too big and can’t be bothered.
After Trek Verdict: Don’t bother.
Drone
Sigh 😦 Next time. Maybe.
4G Dongle/Antenna
I have a few of these but the main one is the Huwei E8278. It supports WiFi from 5 devices while powered from a USB port. It was locked to the Telstra network but I’ve managed to unlock it so I could use the local Nepal network if I had to. It’s main feature is that it allows an external antenna.
I had a vision of using the 4G dongle and connecting my phone and tablet to it for my data connection (and have my phone for voice only). But this was just over complicating things.
The antenna gives another couple of bars of gain.This is perfect if you are in a remote location and need some gain to get that reception.
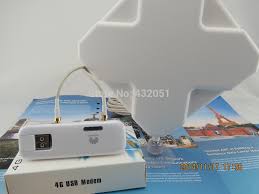
In areas of poor reception I was going to throw the antenna out the window and see what reception I could get (regardless of the fact that there are possibly kilometers of rock between me and the base station). And I was going to need another Nepal SIM card.
But since I abandoned the idea of blogging it just didn’t become necessary.
After Trek Verdict: Don’t bother thinking about it.
USB Detector
As must as I love what my gear is doing, I can’t justify taking the USB detector that I used to work out how the solar panel was working out. I’d try all different angles and times of day to see what I could get out of the solar panel, but the most I could get was around 1.6A and 5V (which works out to be around 8W – much less than the 20W that was claimed).
Oh and of course when it is inside the charger you can’t read it. So you need a small USB Male to Female adapter cable.
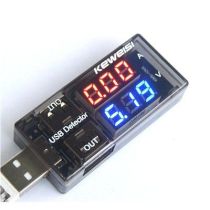
If I brought it I’d just spend too much time looking at it…
Note: I think I’m gonna take it after all…
After Trek Verdict: Leave it at home.
