So I’ve done this a few times, but always with a 1:1 disk size. I always used Clonezilla to write the image onto the new laptop.
But this time I was going cheap selecting a more appropriate SSD for my wife’s laptop. So here are some quick notes on what I had to do to get it to work.
So the challenge: take out a 512GB HDD and replace it with a 256GB SSD on a UEFI boot system (Windows 8.1) on an ASUS S500C. And there is no CD/DVD drive, so bootable USB drives were required. Just to make it more interesting, there were other partitions present at the end of the HDD (some Clonezilla posts about using advanced mode to ignore disk sizes etc didn’t work for me).
Step 1: What you’ll need:

Firstly, a portable USB drive (preferably USB 3.0) that can hold the image. One USB stick which holds a bootable image of Clonezilla (http://clonezilla.org/downloads/download.php?branch=alternative, iso) and the other with GParted (http://gparted.org/download.php, iso). Burn as bootable USB images with Rufus (https://rufus.akeo.ie/).
Step 2: Back it up with Clonezilla. If you stuff it up, you’ve got an exit strategy (there was no way I was going to tell my missus her laptop was stuffed). So the laptop was using Windows 8.1 with a UEFI boot which means you can’t boot without going through the following process.
Go to the update and recovery screen (you can find it by doing a search on “UEFI”):

Select “Advanced startup”, then “Troubleshoot”, “UEFI Firmware Settings”, then “Restart” when you see the option.
Then you’ll reboot and the you’ll see the bios appear. You’ll need to change the boot order to show the Clonezilla USB first.

Then you’ll see Clonezilla and back-up your entire HDD onto the USB drive (beginner mode was fine for me).
Step 2: Run GParted. So you need to make all of this fit into the smaller drive.
Change the USB stick and repeat the UEFI boot sequence from above and boot into GParted.

This process will be different for each environment. What I had was a large useless partition /dev/sda6 (“D” drive). This has nothing in it, so I deleted this partition.
This left an “Restore” partition way on the right which then had to be moved to the left to fit it against /dev/sda5. But you may have to move/resize your own partitions as appropriate.
Ensure the new size all fits into the new SSD size. Things won’t work unless you do 🙂
Step 3: Clone this image on to the USB drive with Clonezilla.
If all goes well, you’ll be able to reboot back into Windows and then repeat the back-up process and create a new Clonezilla image.
Step 3: Modify Clonezilla’s parted file
In the new image, go to the parted file which was called sda-pt.parted for me. It showed the following in my system:
Model: ATA Hitachi HTS54505 (scsi)
 Disk /dev/sda: 976773168s
 Sector size (logical/physical): 512B/4096B
 Partition Table: gptNumber Start End Size File system Name Flags
 1 2048s 616447s 614400s fat32 EFI system partition boot
 2 616448s 2459647s 1843200s ntfs Basic data partition hidden, diag
 3 2459648s 2721791s 262144s Microsoft reserved partition msftres
 4 2721792s 392714239s 389992448s ntfs Basic data partition msftdata
 5 392714240s 393431039s 716800s ntfs hidden, diag
 7 393431040s 435394559s 41963520s ntfs Basic data partition hidden, diag
Back this file up and change the disk size. In my case I just took 976773168 and divided by 2 (multiply by 512 to get the number of bytes on the disk)
Do another sanity check and make sure the last sector is smaller than the sector size you’ve selected.
Step 4: The exciting bit. Pull your laptop apart and replace the HDD with the SDD.
So time to get out the jeweler’s screwdriver and pull the laptop apart by removing the 10 or so screws. There were two different sizes, so be careful to note where they go.
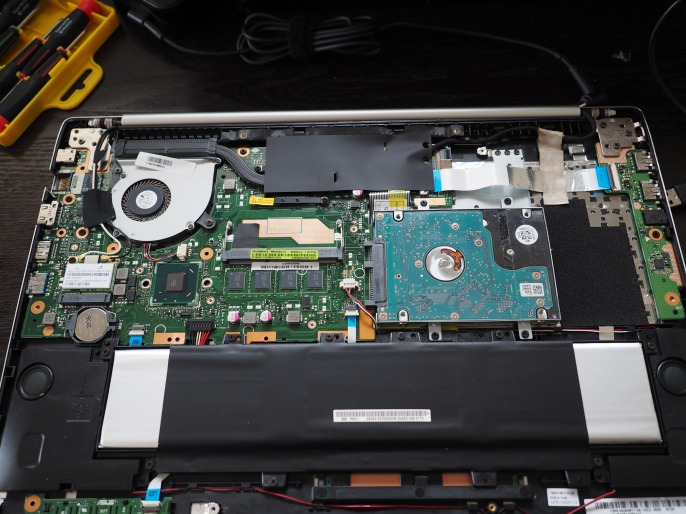 Pull the HDD out and its little bracket. Put the new SDD in and replace the cover. If you’re feeling confident, put all of the screws back in 🙂
Step 5: Burn the new Clonezilla image onto this new drive.
So put the Clonezilla USB stick back in and this should be picked up automatically when you boot. Put the USB drive in and burn the new image that you’ve been playing around with (I used Clonezilla beginner mode). Hopefully there’ll be no complaints from Clonezilla.
Step 6: Reboot and enjoy the faster performance 🙂
All this took a few hours – the backup/restore and the GParted partition writes take some time. And of course mucking around with the partitions in GParted is “fiddly”.
